DEVLOG 02 / Buildcraft
How Artefacts Shape Your Combat Kit
A deep dive into the ten Artefact slots that define Character and Drone combat in Starforged Ascendant.
A Starforged Ascendant build has ten configurable Artefact slots: seven on the Character and three on the Drone.
Every slot supplies a Skill, so choosing equipment is also choosing what the Character and Drone can actually do in combat.
Skills are locked to particular Artefact slots so the whole combat kit can be balanced as a package. A Weapon is where most of the Character's direct damage lives. Armour handles active defence. Boots handle movement. Head pieces, Gloves, Offhands and Belts cover different mixes of support, recovery, control and conditional damage.
This stops a damage build from simply filling every slot with the seven strongest attacks while still leaving plenty of room to lean hard into damage, tanking, healing, control or support.
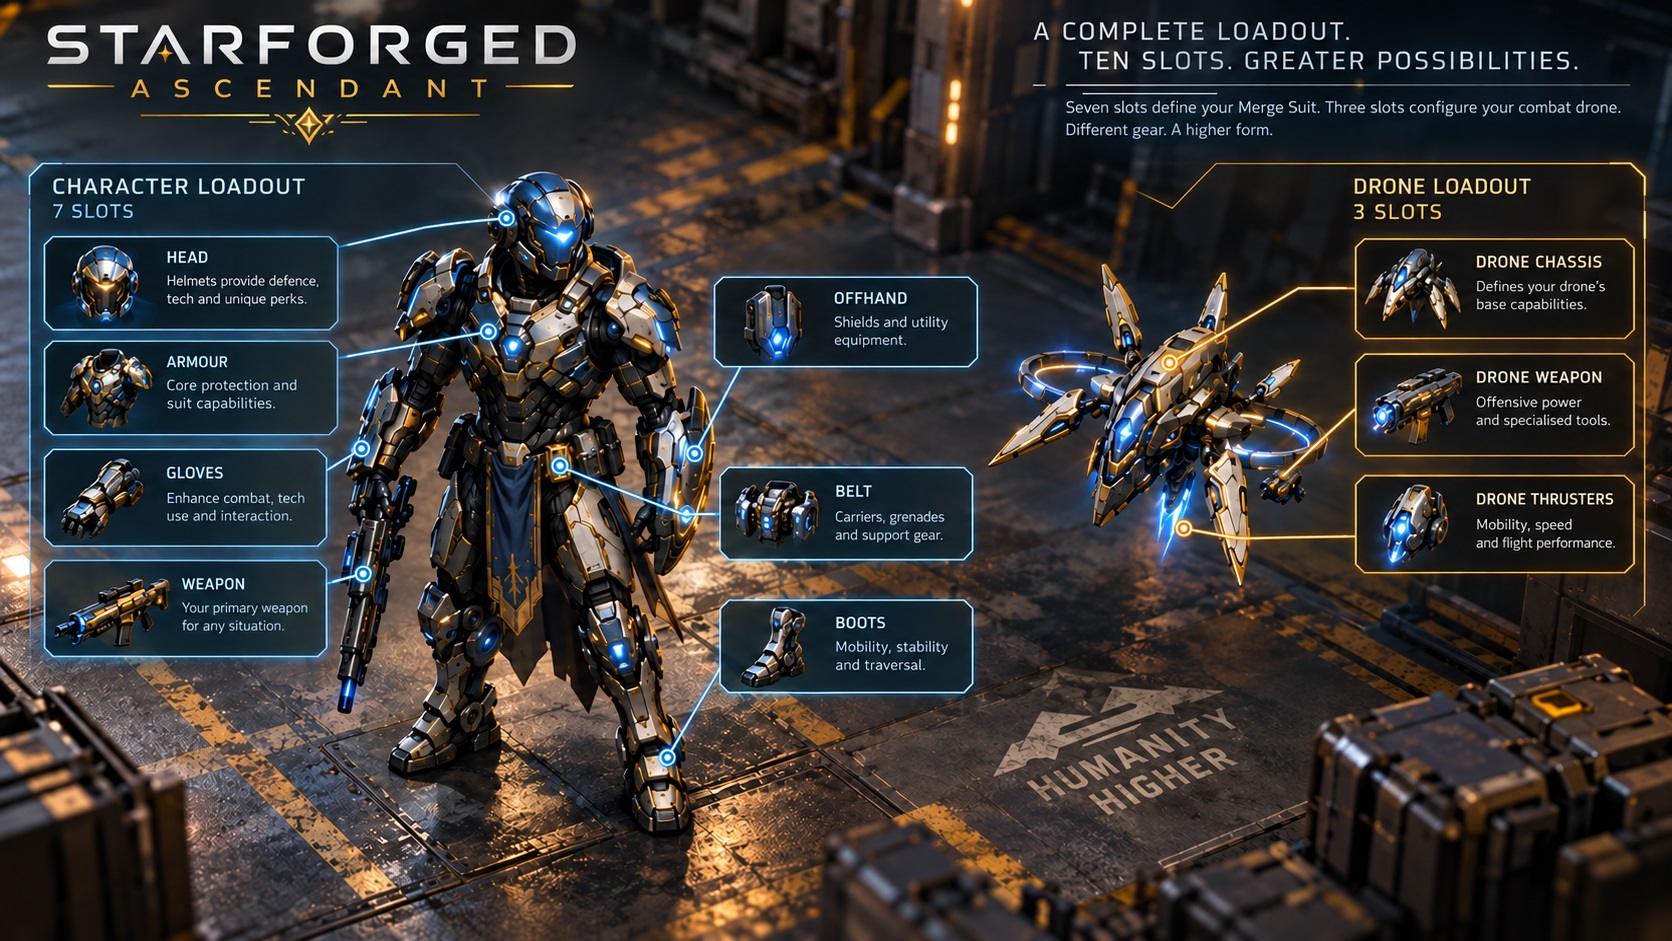
The Character has:
| Slot | What it brings to the build |
|---|---|
| Weapon | Primary damage and weapon mechanics |
| Armour | Sustained and on-demand defence |
| Head | Buffs, recovery and support |
| Gloves | Flexible damage, control and utility |
| Offhand | Strong support, utility and conditional offence |
| Boots | Movement, repositioning and movement-triggered effects |
| Belt | Tactical tools, control and deployables |
The Drone adds:
| Slot | What it brings to the build |
|---|---|
| Drone Weapon | The Drone's main attack or recovery Skill |
| Drone Chassis | A major Drone Skill and the Character's paired Merge |
| Drone Thrusters | Drone movement, positioning and mobility Skills |
Those descriptions cover a lot of different mechanics once you get into the actual Skills.
Weapon: how you want to deal damage
Weapons carry the Character's main damage Skill, with Rifles, Pistols, Shotguns, Melee and Siege weapons approaching that job differently.
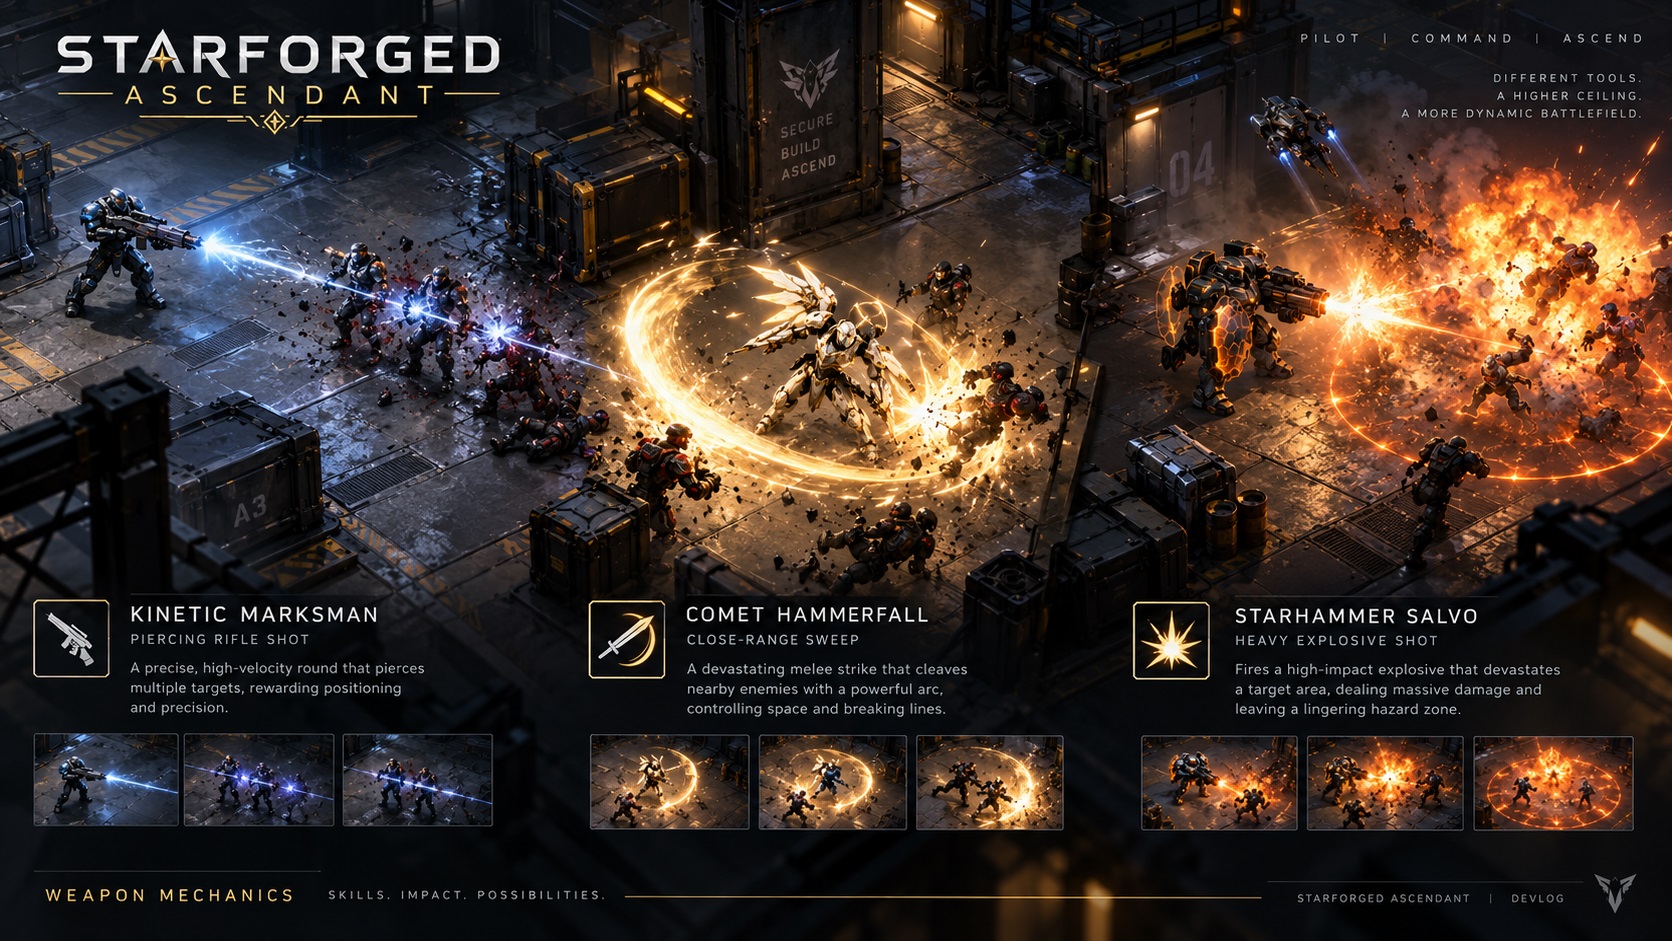
Kinetic Marksman fires a fast Rifle shot through enemies in a straight line. It can pierce the first target and continue into another, so a good firing lane can turn one shot into damage across multiple enemies.
Comet Hammerfall is a very different Weapon Skill. It swings through a broad area roughly seven metres in front of the Character and recovers Shield while it is being used. Melee weapons are generally tuned around shorter recovery times and higher damage output than ranged weapons, with the Character committing to much closer range to get that output. Comet Hammerfall recovers in just over a second, so it can be used as a regular part of the Character's attack rhythm rather than being held back as an occasional large attack.
At the other end of the scale, Starhammer Salvo is a heavy Siege attack. The projectile travels much more slowly, then explodes across a large area and leaves the impact site damaging enemies for another five seconds. A player can fire it into a pack, around an Objective or into an area enemies are about to occupy and get value from both the initial blast and the damage that follows.
Other Weapon Skills can split, ricochet or chain through enemies, and some explosives can bounce or rebound around the environment. The choice between them changes where you want to stand, what enemy formations you want to attack and how much you care about walls, corridors and clustered targets.
Armour: Your primary defensive layer
Armour Skills provide the main defensive cycle for the Character.
Their defensive effects can refresh and overlap during normal play, and the player can activate the Armour Skill again when they want another defensive boost immediately. Utility Strength scales the size of applicable defensive effects and Utility Duration keeps them active for longer, both within defined limits.
Bulwark Field increases Maximum Health by 20% and keeps Health recovery running for several seconds. A Character built around a large Health pool can use it to increase both the size of that pool and the rate at which it is being restored.
Aegis Algorithm is built around Shields instead. It improves Shield recharge behaviour for ten seconds and adds a large amount of Shield recovery, making it useful for a Character that wants to repeatedly rebuild its Shield during a fight.
Starlight Guard takes another approach, adding both flat Maximum Shield and another 20% Maximum Shield while running sustained Shield recovery. A player stacking Shield can get much more value from that percentage increase than a Character with a small Shield pool.
So even within a slot that is clearly about defence, the player can lean toward a larger Health pool, faster Shield recovery or a larger Shield pool.
Head: buffs and recovery
Head Artefacts give the Character buffs that can reinforce whatever the rest of the build is already doing.
Command Vitality increases Maximum Health by 25% while restoring Health over time. It carries two charges, so the player has some control over when to refresh the effect or stack another activation into a dangerous section of a fight.
Tactical Foresight is aimed much more directly at offence, increasing Vital Chance by 20% while feeding Energy back into the Character. It fits naturally into a build that wants frequent Vital hits and enough Energy to keep the rest of the action bar moving.
Focus Beacon raises Power by 25% while restoring Shield, giving the Character a broad increase to Skill output with some defence built into the same activation.
A Head Skill can therefore be part of sustain, offensive scaling or the resource loop that keeps the rest of the build running.
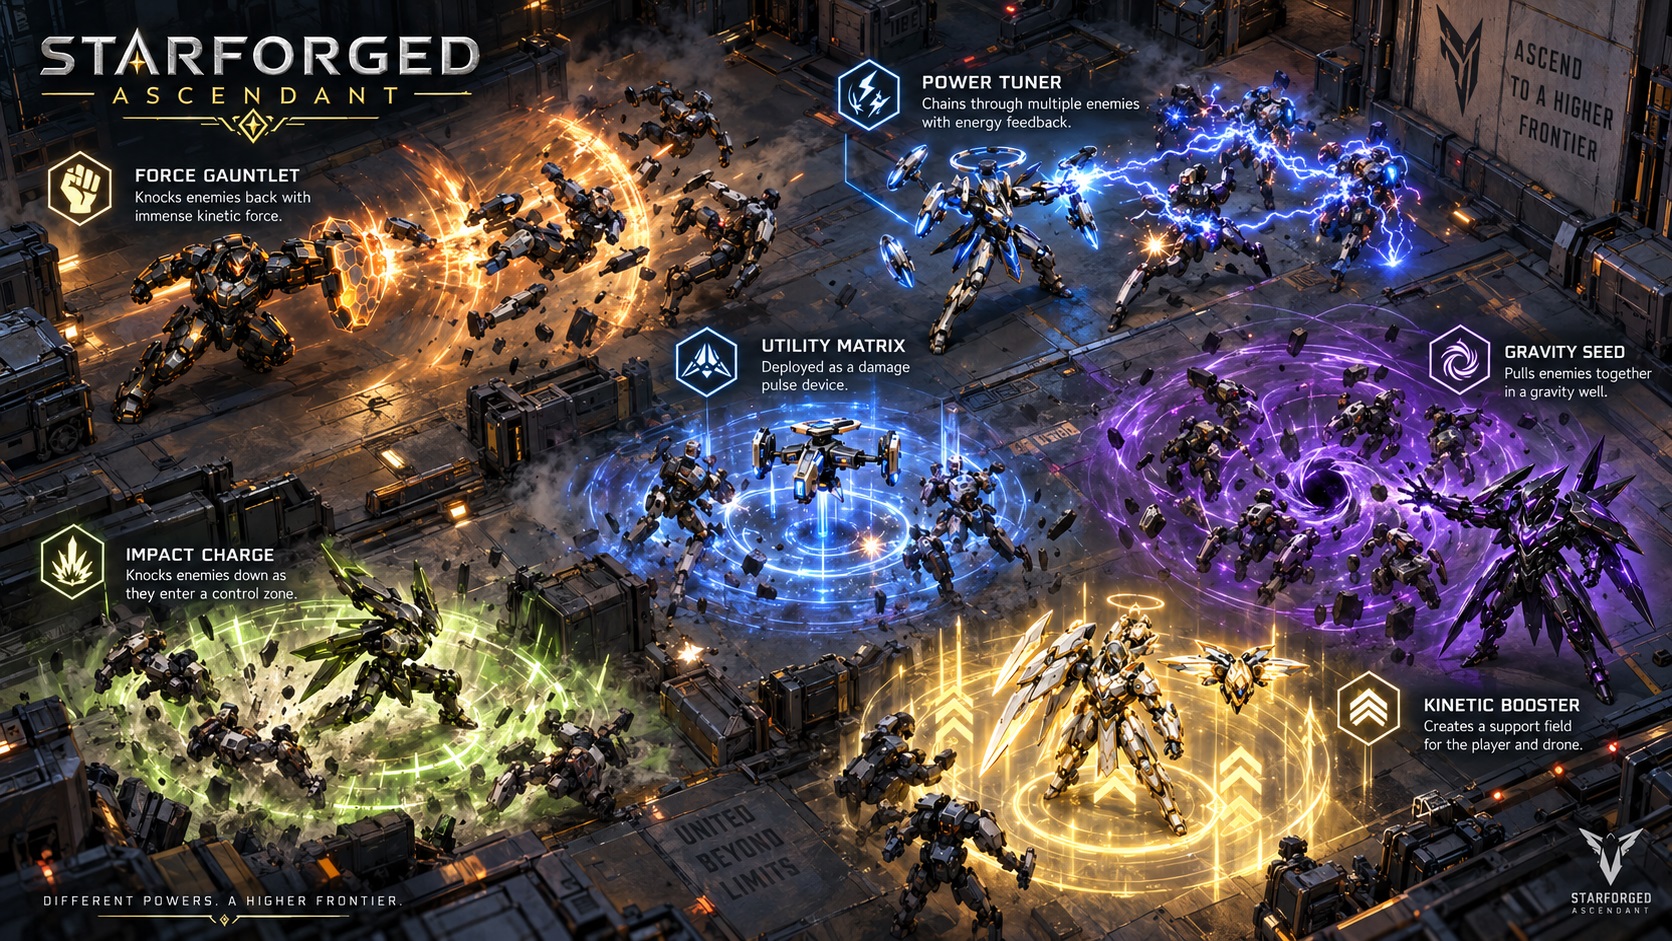
Gloves: Unique combat tools
Gloves are one of the most flexible Character slots, which gives them room for mechanics that would feel out of place on the main Weapon.
Force Gauntlet fires into an enemy, reduces their Armour by 20%, knocks them backwards and starts Shield recovery on the Character. It can create space, soften a tough target for the Weapon and provide some defence from the same activation.
Power Tuner fires a fast projectile that chains through two additional targets. A successful hit reduces the enemy's Power by 20% for 2.5 seconds and starts Energy recovery for the Character. Against several enemies it can spread that damage reduction through the pack while helping fund the next Skills the player wants to use.
Utility Matrix puts a device at the chosen point for five seconds. Once deployed, it pulses damage around itself every second. Placing it where enemies are being held, funnelled or pulled together can turn that small area into a steady source of pressure while the Character does something else.
Those three Skills alone cover knockback and debuffing, chaining attacks with resource recovery, and an independent damage source placed into the battlefield.
Offhand: support and conditional offence
Offhands give up some of the raw damage available to Weapons in exchange for stronger support and utility.
Shield Companion sends out a pulse around the Character that affects the Character, Drone and nearby allies. It raises Maximum Shield by 20% for ten seconds and restores Shield over the following eight seconds, making it useful as both personal defence and group support.
Evasion Relay mixes offence and defence in the same activation. It fires three projectiles in a spread, gives the Character 20% Evasion for ten seconds, and successful hits start restoring Energy. A player can use it before moving into danger, fire through several enemies and carry both the defensive buff and the Energy recovery into the next part of the fight.
Offhands are also a natural place for conditional offence, where damage can depend on placement, triggers or a setup created by the rest of the build.
Boots: Movement and utility effects
Boot Skills are built around repositioning the Character, with the movement itself often being part of the Skill.
Steadfast Advance pushes forward through enemies and shoves them aside along the route. When the Character reaches the destination, nearby friendlies gain Armour and recover Health. It works well for moving into a pack, opening space and bringing the Drone or other allies forward with some extra protection.
Grav-Step turns the destination into the important part of the Skill. The Character moves to the selected point, hits enemies around the landing area and drags them toward the centre. That can pull a scattered group together for the next melee attack, explosive or Drone Skill.
Vector Dash is much more aggressive. It drives the Character up to eight metres through enemies, dealing damage along the path, and every successful hit restores Energy. A good dash through a full pack can reposition the Character and immediately help fund the next sequence of Skills.
The Boots slot can therefore give a build frontline movement, enemy grouping or a fast offensive dash with resource recovery.
Belt: Control the fight
Belts are where a lot of the more tactical tools sit.
Gravity Seed places a gravity well at the selected point for four seconds. Enemies inside are slowed and dragged toward the centre while the Character recovers Shield. It is useful for bunching enemies together before dropping an area attack into them or holding a group in a bad position while the Character deals with something else.
Impact Charge puts a device into the battlefield for five seconds. Enemies that enter its area are knocked down and have their Armour reduced by 20% for five seconds, creating an opening for the Character and Drone to hit them while they are vulnerable.
Kinetic Booster goes the other way and creates a short support zone. The Character, Drone and nearby allies inside gain 20% Movement Speed and 20% Kinetic Resistance, so it can be used when the group needs to reposition quickly or stay in an area under sustained Kinetic pressure.
Between those examples, the Belt can pull enemies together, knock them down and weaken them, or create a temporary advantage for the friendly side of the fight.
The Drone adds 3 more Artefacts and the build-defining Merge slot
The Drone carries its own Weapon, Chassis and Thrusters, and those three Skills can be built around the Character rather than treated as a separate companion loadout.
A Character with plenty of damage can give the Drone recovery and support. A tankier Character can turn the Drone into another source of damage. Control can be split between both of them.
Drone Weapon: damage, recovery or multi-target pressure
Bulwark Mender turns the Drone Weapon into a recovery tool. It fires a repair projectile at a priority friendly target and restores both Shield and Health when it arrives.
Prism Ricochet attacks instead, firing a Kinetic projectile that chains through another two enemies. It gives the Drone useful coverage when several targets are packed together.
Core Lance is the heavier ranged option. It fires a much stronger long-range shot that pierces through its first target, so the Drone can contribute meaningful damage from well behind the Character.
The Drone Weapon also becomes important to several other Drone mechanics, because Chassis and Thruster Skills can trigger or copy the Weapon that is currently equipped.
Drone Chassis: the biggest Drone choice
The Chassis supplies one of the Drone's largest normal Skills and also determines the Character's Merge.
When Merge is activated, the normal Chassis Skill is activated alongside its paired Merge. The Character and Drone effectively enter a short combat surge built around the Chassis that was chosen.
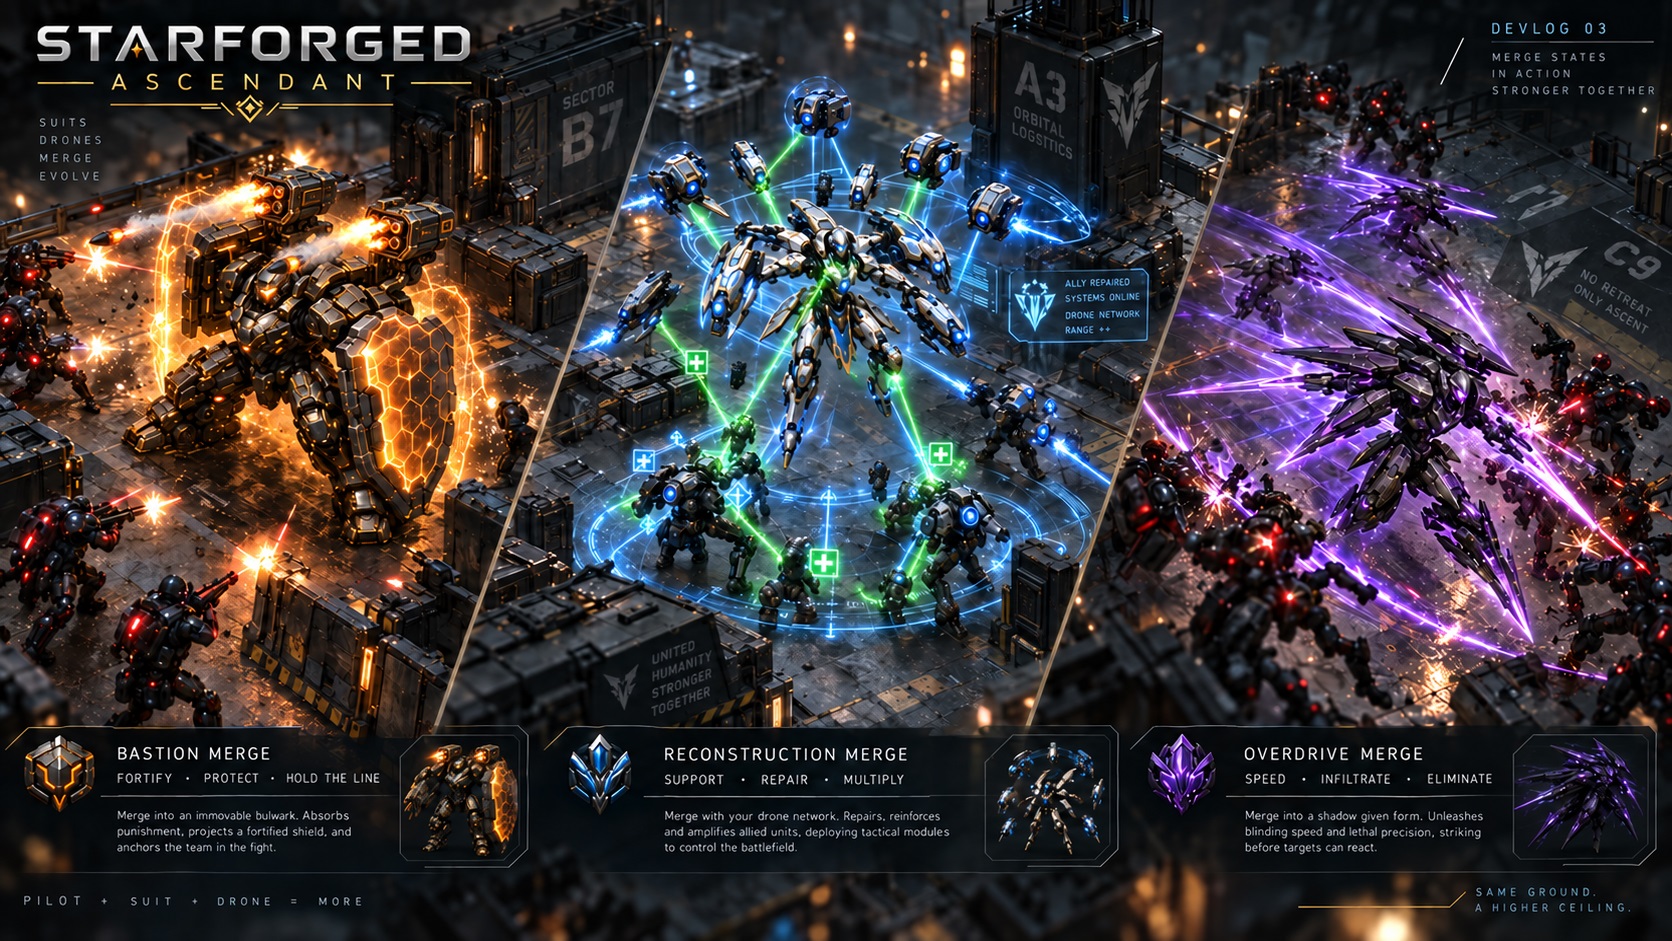
Rocket Launcher Turret and Bastion Ascendance
Rocket Launcher Turret plants the Drone in place for 20 seconds and turns it into an artillery platform, firing another area attack every 2.5 seconds. The Drone gives up mobility during that window and concentrates on repeated fire from one position.
Its paired Merge is Bastion Ascendance.
For 18 seconds the Character takes 25% less damage, gains additional Maximum Shield equal to 50% of their normal Maximum Shield, and immediately gains the same amount as current Shield. A shockwave fires from the Character every second and another pulse fires when the temporary Shield increase ends.
It gives a defensive build a short window where it can absorb far more pressure while continuing to fight in the middle of the encounter.
Mirage Projector and Reconstruction Ascendance
Mirage Projector fires at an enemy and creates a Drone Mirage whenever the shot successfully connects. Each Mirage lasts for 12 seconds and receives a copy of the equipped Drone Weapon, so its behaviour changes with the rest of the Drone loadout.
A Mirage carrying Prism Ricochet adds more chaining attacks. One carrying Core Lance adds another heavy ranged attacker. One carrying Bulwark Mender becomes another source of recovery.
Its paired Merge, Reconstruction Ascendance, runs for 20 seconds. The Character repeatedly releases a recovery pulse to nearby friendlies while another Mirage joins the fight using the Drone Weapon captured when Merge began. Healing beyond Maximum Health is converted into Shield, allowing a strong recovery setup to keep building protection while the Merge is active.
Safeguard Field and Overdrive Relay
Safeguard Field gives the Drone a defensive Chassis Skill. It creates an eight-second protective zone around the Drone, reducing damage taken by the Character, Drone and nearby allies inside it by 20%.
Its Merge, Overdrive Relay, is built around speed.
For 20 seconds the Character, Drone and nearby allies within the activation area have their Movement Speed doubled, recover Skill charges 50% faster, activate Skills 50% faster and pay no Energy costs. Successful hits during the effect also restore Health and Shield, with excess healing converting into Shield.
A group can burn through its Skills at a much higher rate during that window, which gives Overdrive Relay a completely different use from the defensive Bastion Ascendance or the recovery-heavy Reconstruction Ascendance.
Drone Thrusters: where the Drone goes next
Thrusters control how the Drone moves around the fight, and some of them directly interact with its other Artefacts.
Charge sends the Drone up to eleven metres straight toward a hostile target. When it arrives, it hits enemies around the impact point and stuns them for two seconds. It can be used to send the Drone into a pack and briefly shut down the enemies around it.
Blink Skirmish teleports the Drone toward an enemy and immediately activates the equipped Drone Weapon when it arrives, bypassing the normal Weapon cost for that triggered shot. Put Core Lance in the Weapon slot and Blink Skirmish ends with a piercing heavy shot. Equip Prism Ricochet and it ends with a chaining attack instead.
Vector Relay is built around support. It pulses Shield and Energy recovery to the Drone and nearby friendlies for three seconds, giving the Drone a regular way to help sustain the Character and the rest of the group.
Ten Artefacts, One Build
The ten Artefact slots give the Character and Drone a large mechanical toolkit before Power Cores, Augments or Talents are added.
A build could use Kinetic Marksman to fire through lines of enemies, Grav-Step to pull a pack together, Gravity Seed to hold them there, and Prism Ricochet to keep the Drone's attacks jumping through the group.
Another could fight at close range with Comet Hammerfall, use Bulwark Field and Shield Companion for sustain, send the Drone into enemies with Charge, then trigger Bastion Ascendance when the pressure peaks.
A support-oriented setup could run Tactical Foresight or Focus Beacon on the Character, Bulwark Mender on the Drone and Overdrive Relay from the Chassis, creating a short window where the whole nearby group can activate and recover Skills much faster.
Those combinations all start with the same ten equipment slots.
The next layers of buildcraft take those Skills and start changing them further. Power Cores change their Power identity and behaviour, Augments can alter how they are delivered or what happens after activation, and Talents can reinforce the role the player wants the whole setup to fulfil.
For the Artefact system, the starting point is simple: the equipment you choose defines the combat kit you get to build from.